Anatomy of a Roof
Your roof is more than just shingles. It's a carefully engineered system of 10+ layers and components, each serving a critical purpose. Understanding what goes into a quality roof helps you make informed decisions — and spot contractors who cut corners.
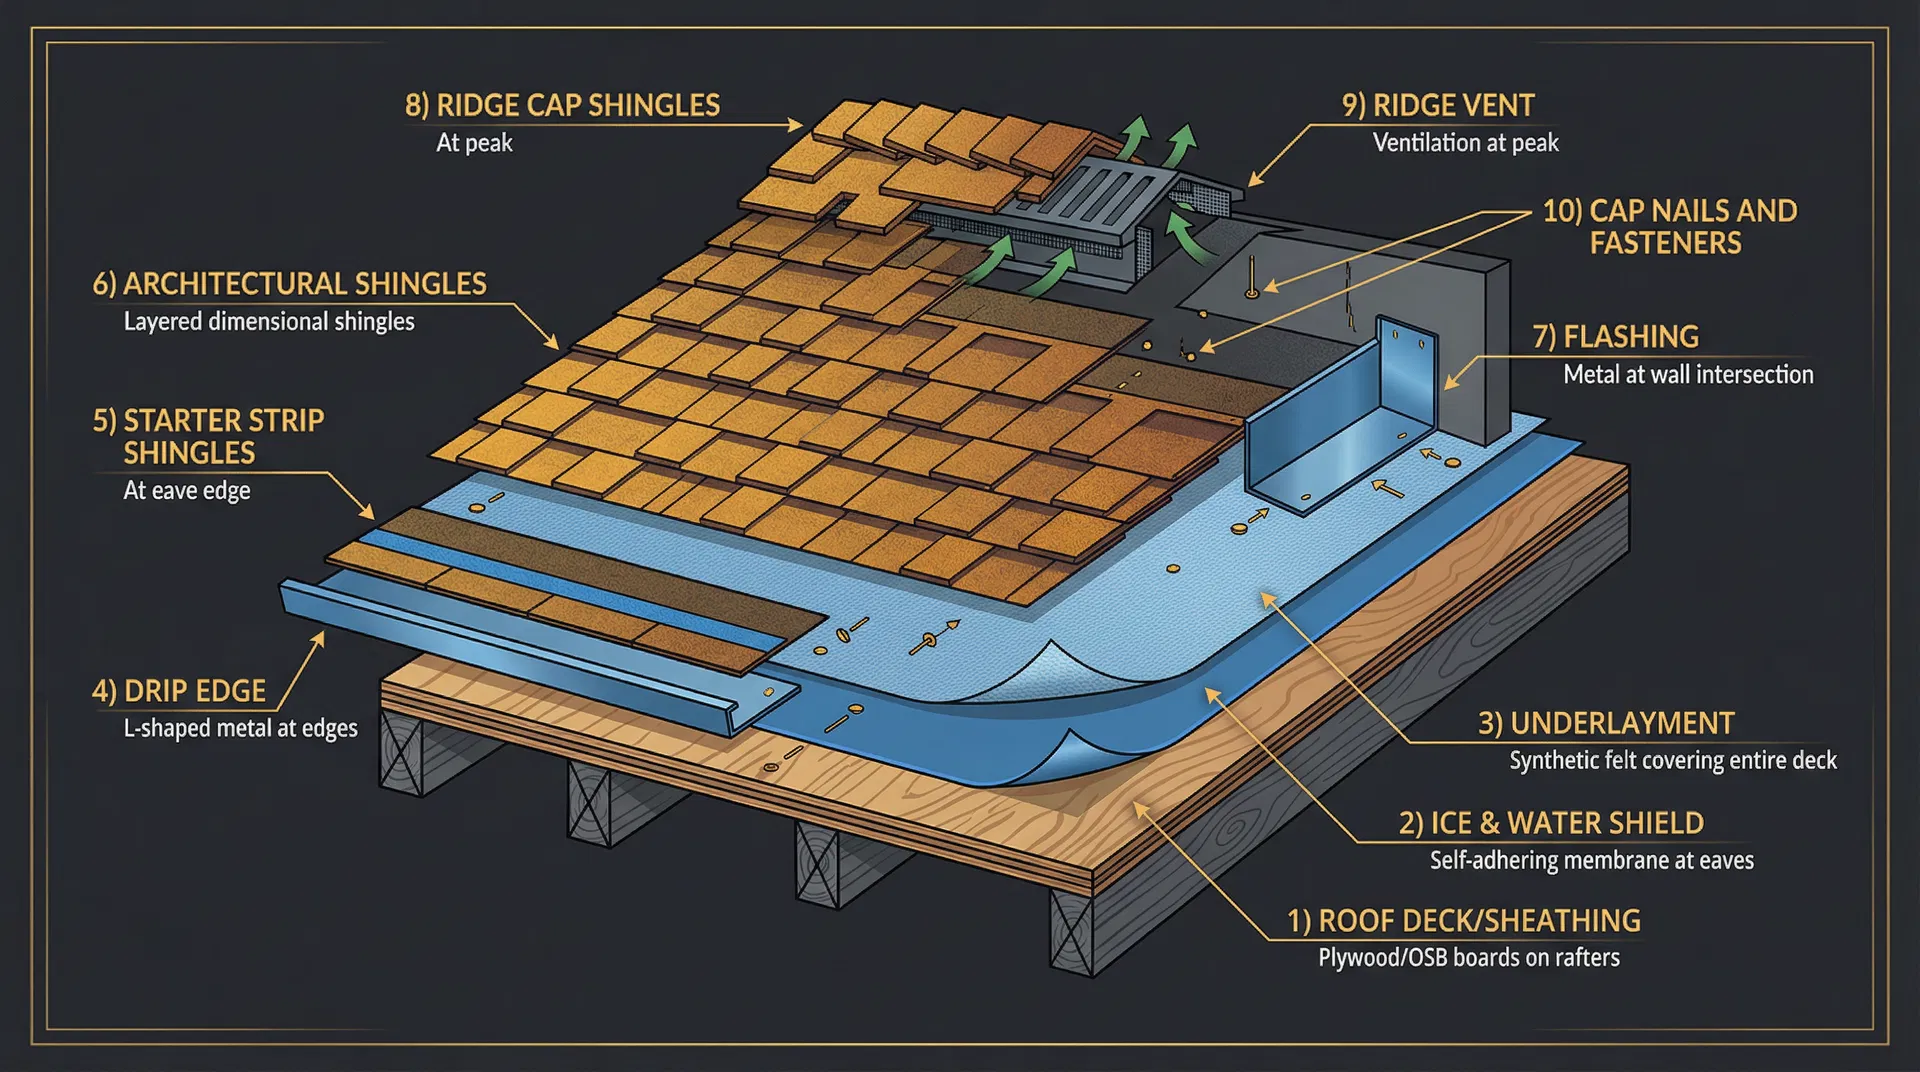
Complete cross-section showing all 10 layers of a properly installed roofing system
EVERY LAYER, EXPLAINED
From the structural deck to the ridge cap at the peak, here's what goes into a properly installed roof — and why each component matters.
The roof deck is the structural foundation of your entire roofing system. Typically made of plywood or oriented strand board (OSB), it's nailed directly to the rafters or trusses and provides the surface that every other layer is attached to.
WHY IT MATTERS
A compromised deck means every layer above it is at risk. Rotted, warped, or delaminated sheathing cannot hold fasteners properly, leading to shingles blowing off in storms and water infiltrating your home.
KEY DETAILS
- Standard thickness: 7/16" OSB or 1/2" plywood for 24" rafter spacing
- Must be dry and structurally sound before any new roofing is installed
- Damaged sections are replaced during tear-off — typically $75–$150 per sheet
- Nailed to rafters with 8d ring-shank nails at 6" on-center for maximum hold
ROOFOPS PRO TIP
During a roof replacement, always ask your contractor to inspect every square foot of decking after tear-off. Hidden rot under old shingles is one of the most common surprises.
FORTIFIED STANDARD
FORTIFIED standards require minimum sheathing thicknesses based on rafter spacing — 3/8" for 16" O.C. and 7/16" for 24" O.C. at the Roof level, increasing to 7/16" and 15/32" for Gold designation.
Why Cap Nails Matter
One of the most overlooked details in roofing is how the underlayment is fastened. Many contractors use standard staples or smooth-shank nails — but these can tear through the underlayment in high winds, leaving your roof deck exposed to water before shingles are even installed.
Cap nails solve this problem with a simple but effective design: a large plastic cap (1 inch diameter) attached to a ring-shank nail. The cap distributes the holding force over a much larger area, making it virtually impossible for the underlayment to pull free.
Stinger NailPac System
The industry standard for professional underlayment installation. The Stinger NailPac combines collated cap nails with the CN100 pneumatic cap nailer for fast, consistent, code-compliant fastening.
- 10x the holding power of standard roofing nails
- Prevents underlayment tear-out in high winds
- Required by most major shingle manufacturers for warranty
- Covers approximately 25 sq ft per 2,000-nail pack
- Ring-shank design prevents nail back-out over time
At RoofOps, we use Stinger NailPac cap nails on every roof we install. It's not optional — it's part of our standard installation practice.
WHAT TO AVOID
- Standard staples: Can tear through underlayment in 40+ mph winds
- Smooth-shank nails: Back out over time due to thermal cycling
- No-cap roofing nails: Tiny nail head provides minimal holding area
- Hand-driven nails: Inconsistent depth and spacing
BEST PRACTICE
- 1" plastic cap nails: 10x holding area vs. standard nail heads
- Ring-shank design: Grips the deck permanently — won't back out
- Pneumatic installation: Consistent depth and spacing every time
- 6" on-center spacing: Meets FORTIFIED and high-wind standards
Your Roof Needs to Breathe
Proper attic ventilation is the single most impactful factor in your roof's longevity. A balanced system prevents heat buildup in summer and moisture damage in winter.
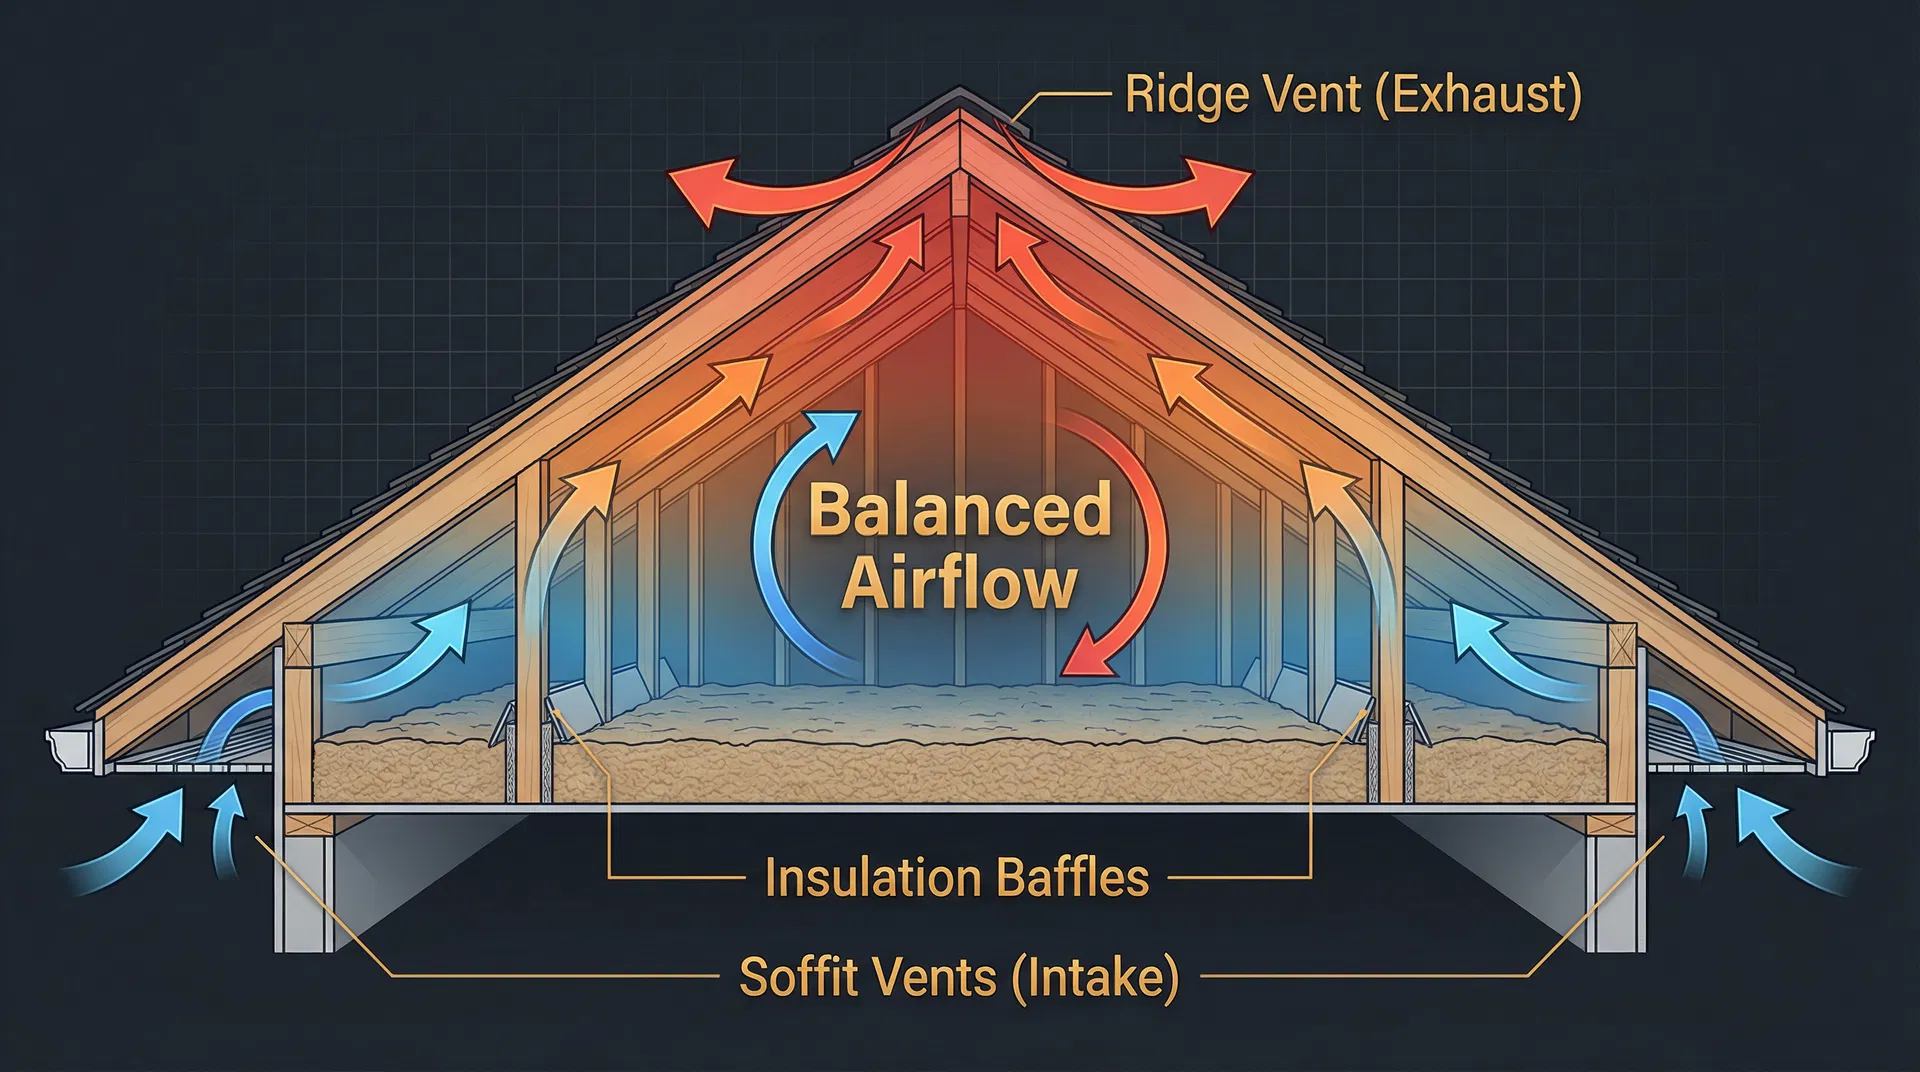
Balanced ventilation: cool air enters through soffit vents, warm air exits through the ridge vent
Summer: Heat Management
Without proper ventilation, attic temperatures can exceed 150°F on a hot day. This extreme heat radiates down through the ceiling (increasing cooling costs by 10-25%) and bakes shingles from below, causing premature aging, curling, and granule loss.
DID YOU KNOW?
Most shingle manufacturer warranties require adequate ventilation. An improperly ventilated attic can void your warranty entirely.
Winter: Moisture Control
In winter, warm moist air from your living space rises into the attic. Without ventilation, this moisture condenses on the cold underside of the roof deck, causing mold, wood rot, and delamination. It also warms the roof unevenly, melting snow and creating ice dams.
THE GOAL
Keep attic temperature within 10°F of the outside temperature. A cold attic means snow stays frozen uniformly — no melting, no ice dams.
Types of Roof Ventilation
Ridge Vents
Continuous venting along the entire ridge. The most effective and aesthetically clean exhaust method.
Soffit Vents
Perforated panels in the eave overhang. Essential for drawing fresh air into the attic from below.
Box / Static Vents
Individual vents installed near the ridge. Less effective than continuous ridge vents but better than nothing.
Powered Attic Fans
Electric or solar-powered fans. Can create negative pressure if soffit intake is insufficient. Use with caution.
The FORTIFIED Program
Developed by the Insurance Institute for Business & Home Safety (IBHS), FORTIFIED is a voluntary construction standard that strengthens homes against severe weather — high winds, hail, and hurricanes. It goes beyond minimum building code to deliver measurable resilience.
FORTIFIED roofs reduce the potential for water intrusion by 95% compared to code-minimum roofs.
Homeowners with FORTIFIED designation can save up to 55% on insurance premiums in participating states.
A FORTIFIED Roof typically adds only 3-5% to a standard roof replacement cost — a smart investment.
Three Designation Levels
FORTIFIED Roof™
The entry-level designation focuses on the roof system — the most vulnerable part of any home during severe weather.
- Sealed roof deck (tape, double-layer felt, or full membrane)
- 6 nails per shingle (vs. standard 4)
- Proper drip edge at all eaves and rakes
- ASTM D3161 Class F or D7158 Class H rated shingles
- Starter strips at eaves and rakes
- Cap nails for underlayment (no staples)
FORTIFIED Silver™
Adds protection for openings — windows, doors, and garage doors — to prevent wind-driven rain and debris from entering the home.
- All FORTIFIED Roof requirements, plus:
- Impact-rated windows or protective shutters
- Reinforced garage doors rated for wind pressure
- Sealed entry doors with proper weatherstripping
FORTIFIED Gold™
The highest tier addresses the entire building envelope — roof, openings, and structural connections — for maximum resilience.
- All Silver requirements, plus:
- Continuous load path from roof to foundation
- Reinforced gable ends and roof-to-wall connections
- Thicker roof sheathing (7/16" for 16" O.C., 15/32" for 24" O.C.)
Interested in FORTIFIED Roofing?
RoofOps can install your new roof to FORTIFIED standards. We'll walk you through the process, connect you with a certified evaluator, and handle the documentation. Read our complete FORTIFIED Roofing Guide for more details.